Songwriting Without An Instrument

Recently someone commented on one of my blogs that they would like to know how to write a song without an instrument.  You would think that because there is music involved, it would be next to impossible to write a song without any musical “ability”. If you are overwhelmed with the idea of learning an instrument, the fact is that many of us assume that we are supposed to become some kind of virtuoso on it which, as a guitar teacher, I can tell you is not true! Most guitar teachers can tell you that.

The Cmaj chord in guitar, with bass in G
Image via Wikipedia

Even if we are not singers, we can all hum.  And if you’ve been around music all of your life, as most of us have, you’ve probably found yourself humming along or singing along with your favourite songs.  If you already have some lyrics written, free yourself from your musical inhibitions by “singing” them in some sort of way that gives you a feel for the meter (rhythm) of them.  Don’t worry whether or not it is GOOD, just do it!  See if you can’t find some kind of melody that matches the meter and then just keep experimenting.  You might find that you “hear” certain melodies with certain lines and not with others.  That could mean that you just haven’t found it yet, or it could mean that the lines with no melodies just aren’t working.  So keep working at it, change the lines or mess around with another melody…just keep trying.  The more you liberate yourself from feeling like you CAN’T do it, the less inhibited you will become.

If you are overwhelmed with the idea of learning an instrument, the fact is that many of us assume that we are supposed to become some kind of virtuoso on it which, as a guitar teacher, I can tell you is not true!  Most people learn an adequate number of chords within a few weeks or months, for instance, to be able to play a good selection of songs that they like.  The fact is that many songs are rather simple in their chord progressions (a chord progression is a series of chords), and so they can be learned fairly easily.  So you can probably learn enough chords in a couple of months to start trying to match them to your lyrics.


As a songwriter, you don’t have to be a master of an instrument to adequately come up with some chords to your song.  So what I am advocating first is that you could pick up a guitar or sit at a piano and fool around with it by ear so that you can familiarize yourself with finding little melodies on it.  It doesn’t have to be a massive undertaking, just a simple way of getting to know the instrument so that you can feel comfortable with it.  Then if you feel ready, you can find some resources to show you how to play some simple chords, and then take it from there.

Your other option is to find someone who CAN play, and who can help you find chords and melodies.  This might take some doing, but then again, there could be someone in your own backyard or circle of friends who already plays and might be willing to experiment with your lyrics.  You can either give the lyrics entirely up to them, or you can sit with them and try to come up with some ideas together.

A third option would be to invest in some kind of software like Band-In-A-Box which is a clever computer software program that you can create backing tracks (music) to your melodies or lyrics with little effort.  You can play with chords without knowing which chords go together, and you can pick styles and instruments, again, without knowing much about them, and still come up with a decent sounding “band” to sing your songs along with.

I was at a songwriting retreat once where one of the participants in my little group didn’t play an instrument at all.  Somehow she had found someone to come up with chords to her melodies, so when it was her turn to perform one of her songs, she just gave the chords to someone who could play guitar and she sang along with him.  I admired her for her dedication to songwriting even though she had never learned an instrument.  And you don’t have to be limited either!

Now I know that some of you out there reading this blog might have suggestions of your own, so if you do, please add them below!  Comments and replies always welcome :-).

IJ

Enhanced by Zemanta

When It’s Time To Record Your Song


There are a number of things to consider when you decide that your song is ready to be recorded.  As a songwriter, you want the best representation of your song;  a recording that makes it stand out without creating too many distractions or losing focus.

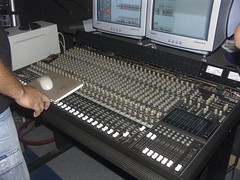
The studio board.
Image by baldguitars via Flickr

Before you make the decision to record a song, make sure it is in its final draft! I know it sounds obvious, but some songwriters are too quick to rush into a studio because they’re all excited about a new song. Does it stand up to the test of time? Have others who can give you some valuable feedback listened to it yet? If you’re a performer, have you performed it in front of an audience? Don’t rush the recording part!

If you have your own recording setup, you’ll recognize some of the terms I’m going to use in this article.  However, I’ll explain or define them as I go for those of you who are new to the idea of recording. First of all, I wrote an article quite awhile ago on the recording process for beginners which you can find here, but that has more to do with the technical aspect of recording.  If you are just about to go into the studio to record a demo, for example, you might want to think about what you want before you get there.

1. Intro Too Long – I can’t even count how many songs I’ve heard recorded by songwriters in their studios or as a demo that take FOREVER to get to the first verse!  Don’t make the mistake of creating an intro that’s so long it’ll make the publisher hit the eject button!  In fact, if you can manage to, don’t have one at all!


2. Do you need an instrumental break? –  If you are pitching a song, a wailing guitar solo is unnecessary and may actually detract from the song itself.  If you are a band, then by all means, put in the wailing guitar solo.  Think about who is going to hear this recording and what will be important to them.

3. Out of Tune – this is something I mention in the recording article too…you’d think it would be obvious, but make sure that your instruments are in tune before you record!  AutoTune (a handy little software device that corrects pitch) can do some magic, but often it can distort the sound of the instrument (including your vocal!), so don’t rely on that.

4.  Leave A Little Room for Arrangements – As a solo performing songwriter, my instrument ended up being the whole band.  Over the years I got better at playing my guitar so that it became the percussion (if necessary), the bass, and everything else I needed to fill the musical “space” when I was performing.  But when I would go into the studio, I’d have to learn to play it less or simplify it so there was room for the other instruments!  You may not be recording your instrument at all because maybe you prefer to leave it to more professional musicians.  But if if ARE, you have to think of your instrument differently when you get into the studio.  Let the bass player do the bass runs, let the drummer drive the rhythm, and unless you are an amazing instrumentalist and it is truly a part of your “sound”, let your instrument be present without being too dominant.  You might consider spending some time with the other musicians ahead of time, if possible, to work out how everything is going to go together.

5.  Keep It Tight – another problem I often hear in demos is when instruments and drums are too loose.  You don’t want to over-quantize (another handy little software device that adjusts the timing of especially midi instruments), because then it won’t feel “real”, but you do want to find the pocket.  I love that word, “pocket”.  I heard Quincy Jones use it in reference to having all of the instruments hit the right note at the right time with just the right velocity (volume) and feel.  Not easy to do, but worth the effort!  One note to think about:  let the drummer drive the rhythm.  When people are recording instruments especially, they try to anticipate the beat of the drummer, and often play just the slightest bit too soon.  Then the song feels off kilter and too loose.  Practice with a metronome or a click track.  Just Google “metronome” and you can find them online.  When you’re working with one, let the click pull your rhythm…it takes a little work but it will improve your timing immensely.

6. K.I.S.S. – when in doubt, less is more.  Don’t try to stuff too many instruments and bits and pieces in there…it’s about the SONG.

7. Lyrics Up Front – It’s about the SONG.  Don’t bury the lead vocal in behind a whomping bass and crashing cymbals and wailing guitar.  You want them to hear the lyrics, right?

8. When You Invite Friends To Play – of course, we all like the idea of having people we know play on our recordings.  But recording isn’t like jamming, it can be very repetitive in terms of getting just the right sound and licks, fills, etc., and then repeating that until everything fits just right.  It can start to feel a little mechanical after awhile.  I once had a guitar player (not a friend, by the way!) come in to do some lead work on a recording.  He had several guitars, lots of effects and certainly had some talent.  But he could not repeat something he had done before or even remember what he had done!  He really was only good at jamming.  In the end I managed to catch a few bits that I could use, but it wasn’t very helpful in terms of adding some real texture to the recording.

Most of these apply, more or less, to a situation where you are singing and/or playing on the recording.  However, some of you are not singers and would rather have someone else do the demo.  There are plenty of demo services around, even online, where you can send a rough recording of the song and have them do it.  It’s important to educate yourself enough so that you can ask for what you want.  If you “hear” things, like instruments playing in particular parts, or you want a certain sound or feel (soft, energetic, etc.) then you have to communicate that to the people recording your demo. You might be too intimidated by the process and just want to give it over without any input, however you might not get what you expect in the end.  Whoever is doing your demo will, and should, ask you lots of questions first in order to establish what will be needed.  Here are some other tips:

1.  Ask – for a demo or sampling of their recordings before you hire them, so you can assess whether or not they can do what you want.  Make sure they are comfortable in the genre your song is in.

2. Trust Your Gut –  If you’re not comfortable with the person you’re communicating with, then go elsewhere.  It’s important to feel that you can say what you want, even if you don’t exactly know how to say it!

3. Educate Yourself – as I said before, the more you know about the process, the more confidently you can ask for what you want.  If you don’t understand something, ask.  There are lots of places on the internet  where you can research what happens in a studio and the terminology that is used.

4. Everything Up Front – most studios will offer you a package deal, one price that covers everything that you want included.  If you want some changes after the fact, you’ll have to negotiate that, but don’t let them nickel and dime you.  Be sure that it’s clear what you are going to get for your money before you proceed with anything.

It’s exciting to hear your song recorded properly for the first time. If you take the time to consider everything I’ve mentioned above, there won’t be any unpleasant surprises and you’re ready for the next step…putting it “out there” for the rest of the world to hear :-).

Reblog this post [with Zemanta]

What Fred Taught Me


I started writing songs when I was about 12, but it wasn’t until I was almost 20 that I took my first songwriting workshop. It was an 8 week course, facilitated by a fellow named Fred Booker. Fred was a real character and a great teacher, who was born in Chicagoand ended up living in Canada for reasons I never quite figured out. He would teach songwriting classes at Douglas College in Vancouver, but he also traveled and performed constantly, applying for arts grants to record and tour. So he pretty much made his living from music, not an easy thing to do at any time!

Fred Booker
Fred Booker

His style of writing was very blues-influenced with a smidgen of folk, totally character-driven and very entertaining. In the course he talked about exploring the guitar and doing different things with it without getting too much into theory, which was just what I needed and something I still remember. Sometimes he would sit in front of the class, clasping his head in his hands, looking for the right words to make his point, and then he’d deliver this compelling and passionate monologue on some aspect of songwriting that would mesmerize me. Yes! I knew EXACTLY what he meant! And there was a word for the technique, and others did the same thing too! Fred’s course introduced me to the lingo that described what I had always done instinctually, without labels or any thought to what I was actually doing. I knew what a verse and a chorus were, but what I didn’t have names for were things like “tension” and “contrast” and “dynamics”. I was so thrilled to listen to someone speak in my language and put words to my efforts.


At the risk of sounding like a prima donna, I was one of the stronger songwriters in that class. I was not very good when I think of it now, but most of my classmates were less experienced than I was. I was also the biggest chicken. When it came to introducing a new song to the class, which we each had to do at least once over the 8 week period, I was tortured with nerves, and on the night of the very last class where we each had to perform a song, I didn’t show up. What a coward, eh? 🙂 And here I am many years later, writing articles about songwriting for newer inductees, thinking about what Fred taught me and realizing how important it was for me to understand the mechanics of writing, not just the inspiration behind it. Being inspired is one thing; just letting it all spill out in one big blob of emotion and getting it out of your system.

But the craft is something entirely different…sometimes I think the crafting of a song is where true inspiration kicks in, because you have to mull it over and over and find some way of tying everything together, which takes so much time and patience…and ultimately talent! What Fred taught me was to THINK about what I was saying, to push my musical and lyrical boundaries and most importantly to enjoy the process. He made me think of myself as a songwriter, not just a person who happens to write songs.

What’s the difference? I think your attitude about yourself and your purpose changes when you take your craft more seriously…I don’t mean that you become an arrogant snit; in fact there is something humbling in the recognition that you can do something that really affects people. Not everyone hits the point in their songwriting where they want to take it outside the bedroom (or wherever they write!) into the rest of the world. Some never desire more from it than a way to entertain themselves, and so it should be. But some of us feel that nagging or yearning for others to hear what we’ve created.And even though I was a coward at the time, I realized the importance of making my message clear, and I took that new understanding and still carry it with me.

Fred came to see me perform at a place called the Soft Rock Café in a Vancouver neighbourhood called Kitsilano months after that last class . He came up to me afterwards and commented on one particular song where I had done some of that exploration of the guitar neck that he had spoken about. I knew he had been listening with a critical ear the whole evening, and it made me nervous, so I was very pleased to get a positive response. Not long after that, when I joined a band along with another fellow who had also taken Fred’s class, Fred came to visit us one night and we enthusiastically discussed songwriting for hours. It was a heady time. And then I lost touch with him.

Recently, I tried to find some trace of him, using the internet of course 🙂 I found a link to a book of poetry where one of the contributors was a guy named Fred Booker, but not much else. I still have his album “On The Road”, autographed, of course, and my guess is that Fred is probably still out there creating something, whether it’s a song or a poem, still thinking about the process and maybe even still teaching, who knows? I never had the chance to thank him for all that he gave me, so I’ll do it now. Thank you, Fred! What a great teacher you are!

[PS…this was an old article written perhaps five or six years ago that I recently decided to dust off and re-post. Just for fun I thought I’d look for Fred again too, and to my surprise I found him!  He had recently written a book called “Adventures in Debt Collection” and was still living in the Vancouver area.  I also found a picture of him, posted above.  As I researched more into his book, however, much to my sorrow I discovered that Fred passed away in 2008 at the age of 69.  I’m very sorry I never had the chance to thank him for his enthusiasm and inspiration.  I found him and lost him again in the same day…there must be a song in that…IJ]

Enhanced by Zemanta

Q & A – Putting Music To Lyrics


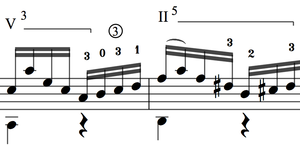
Barre chord notation in classical music uses r...
Image via Wikipedia

© I.Woloshen

Here’s an email I received:

Dear Irene, I play guitar (lefty), just started, and i find it sometimes abit hard to get songs i like (like, by famous people, from the radio, whatever) abit hard to play, because i can’t get the exact tune. So i wanted to start writing my own songs. So i sat down to write some, and i couldn’t. i mean, i wrote a couple, but i can’t seem to accompany my voice (which isn’t very good) with my guitar. i like chords more than notes, so i just go through all the chords i know, just the main ones, and try to fit it together. Anyway, the whole point of me writing, is to say thankyou, you’ve helped me quite abit. But could you please put abit more about putting music with lyrics.

I began writing songs for the same reason you did…I couldn’t play my favourite radio hits! In fact, over the years I’ve met many songwriters who started for the same reason.


When I was in Grade 12, I was given the opportunity to write some music to several poems in the play “Through The Looking Glass”. The idea was that I would play and sing them during the performance with the cast…I was put up in a loft at the back of the stage with a sound system. But the first REAL challenge was writing the music. I had always come from a “music first” place in my songwriting, and never before had tried it the other way around, so when I first sat down with all of these strange poems, I had no idea where to start. After succeeding with one of them, the others came more easily. Here’s what I learned, and what I use to this day…maybe some of it will help you:

1. A song lyric should have a built in rhythm, or “meter”….which means when you read it out loud, you can sense a beat to the words. This will help you to establish the time signature…4/4 is most common, four beats to the bar. Simply speaking, the strum pattern on your guitar should reflect this time signature.

2. Before you even establish the chords, you need to find a melody that matches the lyrics. Don’t go near any instruments until you’ve tried just singing the lyrics accapella (without accompaniment) and found a melody. This takes practise! Look at the structure of the verses…how many lines are there? Are the lines the same length of syllables, or are they different? If you’ve got an even number of lines, say 4 or 6, try singing one melody for the first line, and then another for the second…repeat the first melody for the 3rd line and the second melody for the 4th…see how that feels. Keep it simple. When you get to the chorus, that should be a different melody. Try singing it higher up…the chorus is a kind of climax, if you will, so it needs to be more dramatic in some way. Raising the melody at the chorus is one way of achieving that. If there is a bridge…sing that differently too. Essentially, each part of the song has its own mini-melody, but they all fit together. Creating a great melody is not achieved instantly! Well, not in most cases anyway 🙂

3. Let’s assume you’ve found a melody…now what are the chords? There are several ways you can go about this, most of them take time! First of all, you can randomly look for a chord that “fits” what you’re singing. Knowing a little bit about chords will take you a long way. Is it a sad song? Should the chords be minor chords, or is it upbeat? Do you hear chords around it already in your head when you sing the melody? If you play guitar and have a capo, use that as a means of getting into a key that suits your voice and the melody…you don’t have to play barre chords or fancy progressions, just use the capo up the neck until you find something that’s close. Get yourself a chord book and find out what chords are in a key…which chords go together, in other words. Try out some of the other chords in the key you decide on.

4. When should a chord change? This is where your “ear” really comes in handy. When you listen to a song on the radio, can you hear when the chord changes? If you can, you’re already half way there. Start out simply, by playing one chord all the way through the first verse, let’s call it “Chord 1″…when you hear that the melody doesn’t “fit” that chord, that’s where you should change chords!

Okay, so now you need to find “Chord 2″…look in your chord book at all of the chords associated with and in the same key as “Chord 1″…and try them each out. Most likely, one of them will fit. So now we have “Chord 1” and “Chord 2”. Maybe your verse looks like this:

Chord 1
La, la, da da da, la, la, la

Chord 2
La, da da, la, da da

Is the rest of the verse repeating these phrases? Or are they different somehow? If they are the same, use the same two chords again. If they’re not, try another “associated” chord, or a chord in the same key. Now maybe you’re getting a feel to your song. Use the same process for the chorus, if you have a chorus, and the bridge, if there is one.

That is a beginner’s approach to writing melodies/chords to lyrics…remember to keep it simple! And when it gets “boring”, make a change! No one can write those melodies for you, it is something you learn to develop in yourself over time and with much patience (and sometimes none 🙂 Good luck!

Reblog this post [with Zemanta]

Your First Open Mic – A Few Tips

Rhino's open mic music & poetry
Image via Wikipedia

© I.Woloshen

What is an open mic? For those of you who don’t know the term, it is an event usually held at a bar or a coffeehouse where songwriters or performers take turns going up, sometimes on a stage, sometimes just a riser, and playing a short set of songs. Occasionally, open mics are a mixture of songs and poetry and/or readings. Sometimes there is a microphone, but occasionally it is also acoustic (no mics or amplifiers, etc.) Some are weekly events, others monthly or only occasionally. They are usually “hosted”, meaning that there is someone there to introduce each performer. If you have never been to one, just go to one one evening to see how it works first before putting yourself under the stress! Even if you don’t want to be a performing songwriter, you may find yourself someday sitting nervously in the audience of an open mic event, holding your guitar in your sweaty hands, waiting for your turn 🙂

First of all, why do an open mic if you’re not a performer? Why, to expose your songs, of course! Other than creating a demo tape, which can be expensive, the easiest way to get immediate feedback on your songs is by playing them for somebody. If you want to put them out there with the “best”, this is one small step to taking you there.

I have been to and played at many open mics, and I’m still more nervous at an open mic than at one of my performances! Why? Because there is little time to relax and get in the groove when you’re only playing 1-3 songs, and because you are essentially competing with every other songwriter who gets up there to play. As supportive and as enthusiastic as we songwriters try to be with each other, we are still competing with each other for the same audience! PLUS, if you are playing in front of other songwriters, you KNOW you can’t get away with anything 🙂


I have written another article on performing tips (which you can find here), but in this particular article I want to discuss a few other things to think about.

WHICH SONGS TO PLAY? – If you are only allowed one song to play, this can be a tough one! My immediate response would be this: don’t make it a ballad! Why? Slow tempos are not always a good choice because the energy level of the performance can be so low key. Now, if you have a particularly KILLER ballad that you KNOW blows people away, this might be a different story! But for the most part, you are better off choosing an upbeat, or at least a faster song. Chances are, you’re going to play it the fastest that you ever have! That’s because you’ll be nervous and there will be a lot of adrenaline in your body! Better to play a fast song faster than a slow song too fast!

If you have a choice of two or three songs, make them all very different. This not only provides contrast in your performance, but it will show your diversity as a songwriter!

Something else to consider…depending on whoever plays before you, you might actually think of having a couple of songs to choose from as your first song (or only song!). You don’t want to sound like the songwriter who just played, you want to stand out! This actually might be a good time for your killer ballad…if the last three songwriters have all performed fast, upbeat songs, your ballad would be a wonderful contrast, and really make you stand out!

HOW LONG? – I don’t mean how long will you be playing, I mean, how long should your songs be? There is nothing worse than a 10 minute song at an open mic. I don’t care how much you like it, you will come across as self-indulgent and not caring about keeping your audience’s attention. Many open mics will give you 10 minutes, rather than giving you 3 songs. Don’t fill the whole 10 minutes with one song, pick three of your shortest, and come out under your ten minute limit! This will also engraciate you to the hosts of the evening…they just love it when somebody actually sticks to the rules or makes things easier for them!

ORDER OF PERFORMERS – This is a toughie…so much can depend on where you are in the list of performers. Many times you don’t have a choice, but if you do, I suggest sticking yourself somewhere in the middle your first time out. Playing first is just TOO nerve-wracking, and so is waiting to play last! In the middle, you have a chance to see what some of the others are doing, and then once you’ve done your set, you have a chance to relax enough to actually hear the rest!

However, if you are stuck with first, there are some positive things you can focus on. You can blow them away with your songs and give the rest of the songwriters something to live up to! If you are last, you can show them all that you were saving the best for last! Okay, I’m just pumping you up here…but that’s my job 🙂 Sometimes the size of the audience will vary extremely from the first to the last person up. Occasionally, everyone shows up at the beginning and then they slowly wander off as the evening progresses…but the opposite can happen too! Sometimes the audience kind of saunters in over the evening and the biggest numbers of people are at the end. You just never know! I have been in both situations…sometimes playing at the wrong end of the evening where there were the least people. There’s nothing you can do about that. It could be the venue, it could just be a fluke.

INVITING FRIENDS – Some people are more nervous if they are playing to people they know. If this is the way you are, don’t bring anybody! But there might be a comfort level in having people you know in the audience, a support group, if you will. You are guaranteed noisy, raucous applause for one thing! And they might be able to help keep you calm while you are waiting to play. Think about how you are with people…do you turn into a nasty jerk when you’re nervous, or just a sobbing misfit? 🙂

PREPARING YOURSELF – Your first time at an open mic should be thought of as a learning experience so don’t have too many expectations of yourself. There are a couple of things you should think about when you’re preparing to play your first open mic. First of all, it goes without saying…know your songs well! Choose the songs you are most comfortable with, not necessarily your newest.

Having said that, there is such a thing, I believe, as OVER-practicing. I say this for a couple of reasons. First of all, you will never be able to duplicate what you are going to feel like on a stage when you are in the comfort of your own home. You are likely going to make mistakes, no matter how hard you practise. It is good to practise enough to be able to recover from those mistakes, but sometimes there is an expectation that arrises with a LOT of practice. If you insist on practising the day of the open mic, do it early and then leave it alone. This is the second reason I say don’t over-practise…you want to feel “fresh” with the songs…sometimes knowing them too well affects the energy of your performance. Don’t believe me? Okay, try it your way 🙂

  • If you’re playing guitar, put on new strings, but put them on the day before. This way they have a chance to stretch so they won’t go out of tune on you too quickly. And make SURE you are in tune! Don’t waste any time on stage tuning…this should all be done beforehand…it bores the heck out of your audience! Sometimes you’ll have a minute to tune at the venue before the open mic begins. This is ideal.
  • Do you need to warm up your voice? Go into the bathroom and hum a little to yourself before the evening begins. Online tutoring sites like takelessons.com provide great resources for vocal warm-ups.
  • Get to the place early. I always recommend this…if you are in too much of a rush, not only will you have to deal with adrenaline, but also a fast heart rate and a panicked state-of-mind (not to mention a few extra wet patches on your new shirt!). Give yourself lots of time to get used to the place, even go up on the stage if you can so you’re going to know what it’s going to look like “out there”.
  • And lastly, in terms of preparation, forgive yourself in advance for your mistakes, because you’re likely going to make a couple. They may not be HUGE errors, but they will be the ones that will bug you, because you know what your songs is supposed to sound like! Remember that chances are nobody else does! This always helps me to get through my blunders. Until I get people who show up who know my songs REALLY WELL…then I know I’m in big trouble 🙂

OTHER PREPARATION – Be well-rested, don’t drink coffee beforehand (coffee will just make you more jittery than you already are), go to the bathroom, have a glass of water…okay, not necessarily in that order. While you’re sitting in the audience beforehand, do some deep breathing…take a slow breath in through the nose and quietly blow it out of your mouth. Focus on something that calms you. Wear clothes you are really comfortable in. I once wore a pair of jeans that were too tight, and when I had to sit on the stool, which had a shiny finish, I kept sliding off! This was so distracting, I almost messed up my entire set! So much for vanity!

WHEN IT’S YOUR TURN – I know you’re going to be nervous, almost everyone is to one extent or another, so it’s almost silly to say “enjoy yourself”, but I’m going to! The first time is just too much pressure to be all and to do everything right. But think of this: these are your wonderful songs!! Don’t you just love playing them and hearing them? Get into that state of mind if you can think of it, and it will help you to relax a little. Try to smile, don’t avoid eye contact with your audience if you can help it, and go for it!

As I said in the beginning, try not to have HUGE expectations of yourself on your first time out. The more open mics you attend, the more you will get used to what happens to you when you’re nervous, and you’ll be able to cope more effectively. Every time is different, every open mic another chance for people to hear your wonderful songs. You’ll be an open mic “pro” in no time! Good luck 🙂
Reblog this post [with Zemanta]